


Welcome to the new shoe showdown! Let's be real—nothing zaps the fun out of shiny new sneakers faster than a surprise "ouch!" from a pesky blister.
But guess what? You've got this! The secret to winning this battle is all about prevention. And it all kicks off with getting the perfect fit from the very beginning.
Winning the Battle Against New Shoe Blisters
We've all been there. Your kiddo is bouncing with excitement over their new shoes, only to end up in tears after just an hour of play. It almost feels like a parenting rite of passage, but it really doesn't have to be.
A little prep work can turn a potential meltdown into a day full of happy, comfy adventures.
The number one villain behind those dreaded blisters? Friction. When a shoe constantly rubs against your child’s delicate skin, it creates a "hot spot" that can quickly bubble up. And this isn't just a minor annoyance—friction blisters are a huge deal, with over 5.2 million people dealing with them every year. So no, you're definitely not alone in this fight!
Nailing the Perfect Fit
Your first and most important mission in the war on blisters is making sure the new shoes fit just right. A shoe that's too tight will pinch and rub like crazy. But one that's too loose is just as sneaky, causing their foot to slide around and create friction in all the wrong places.
Here are a few tricks I’ve learned to get the fit right every time:
- The Thumb's Width Rule: After your kiddo pops the shoe on, press your thumb down at the very front. You’re looking for about a thumb's width of space between their longest toe and the tip of the shoe. This gives them that crucial wiggle room to move and grow!
- Shop in the Afternoon: Here’s a super-pro tip: feet naturally swell a bit as the day goes on. By shopping for shoes in the afternoon or evening, you're fitting them at their biggest, which helps avoid a fit that becomes uncomfy later on.
- Wiggle Room is Everything: Have your little one stand up and take a little stroll around the store. Then, ask them to wiggle their toes. If they can’t move them freely, the shoes are probably too narrow or short.
Remember, a good fit is about more than just length—it's also about the width and depth. The shoe should feel snug and secure around the whole foot, especially the heel, but never tight. This is even more critical for babies just starting their walking journey. For more on that, check out our guide on the best shoes for baby learning to walk to make sure those first steps are happy ones.
Your Blister Prevention Toolkit
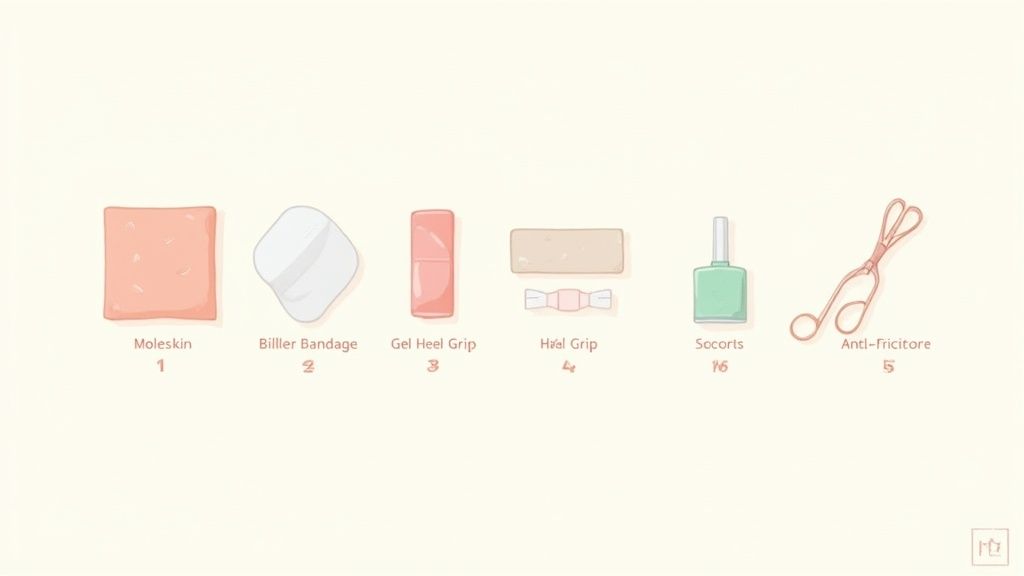
So, you’ve found the perfect pair of shoes! High five! That's half the battle won. Now, it's time to assemble your secret weapon: an anti-blister toolkit.
Think of it as your first-aid kit for happy feet. Having these items ready means you can stop a blister in its tracks the moment you hear that dreaded, "Mom, my shoe is rubbing!"
The Must-Haves for Happy Feet
You don’t need a whole pharmacy aisle, just a few tried-and-true heroes that can make all the difference. Here’s what we always keep on hand:
- Moleskin: This is the MVP for a reason. It’s a soft, sticky cotton flannel you can cut into any shape. Before your child heads out in new dress shoes or boots, just stick a small piece onto any potential hotspot, like the back of the heel.
- Anti-Friction Balm or Stick: This is like an invisible shield for skin. A quick swipe on problem areas—around the pinky toe or along the top of the foot—creates a slick surface that lets the shoe glide instead of grab. It’s a lifesaver for long days of play.
- Gel Heel Grips: These small, sticky gel pads fit right inside the back of the shoe. They’re fantastic for shoes that are just a tiny bit loose, as they stop that heel slip that almost always leads to a nasty blister.
Smart Solutions for Tricky Spots
Sometimes, the usual suspects aren't quite enough. That’s when it’s time to bring in the cool gadgets, like blister-specific bandages. These are brilliant because they provide a thick cushion that protects a spot that's already red and sore.
The real goal is to reduce both the direct pressure and the friction that causes skin layers to separate and form a blister. Research shows that strategic taping with products like moleskin is incredibly effective. For a deeper dive into the science, the Public Health Command has some great findings on these preventative measures.
Having a well-stocked kit gives you peace of mind to handle any rubbing that comes up.
Your Anti-Blister First-Aid Kit
To make it even easier, here's a quick-glance guide to the essential tools you'll want in your blister-prevention arsenal.
| Tool | Best For | Parent Pro-Tip |
|---|---|---|
| Moleskin | Preventing blisters on known hotspots like heels and toes. | Cut a donut shape to place around a sore spot to relieve pressure. |
| Anti-Friction Balm | All-over protection, especially for strappy sandals or cleats. | Apply it before they put on their socks for a seamless barrier. |
| Gel Heel Grips | Shoes that are slightly too big and slip at the heel. | Make sure the inside of the shoe is clean and dry before applying for best stick. |
| Blister Bandages | Covering and cushioning a spot that's already red or sore. | Choose the hydrocolloid kind—they create a happy healing environment. |
With these items ready, you can tackle any new-shoe challenge that comes your way.
Remember, these tools are your first line of defense, but proper shoe maintenance also plays a huge role in keeping them comfy. For tips on keeping new shoes soft and supple, check out our pediped care instructions. A well-cared-for shoe is always a kinder shoe!
The Unsung Heroes: Socks and Shoe Materials
Think of socks as the trusty sidekicks to your child's new shoes—they play a huge role in the fight against blisters! A great pair of shoes can be let down by the wrong socks, so let's give them the attention they deserve.
The real enemy of happy feet is moisture. When feet get sweaty, socks get damp, and that damp fabric creates a ton of friction. This is why cotton socks, while super cozy for lounging, can be a blister's best friend during a long day at the playground. Cotton soaks up moisture like a sponge and holds it right against your child's skin. Yuck!
Choosing Your Sock Superstars
Instead of cotton, look for socks made from moisture-wicking fabrics. These materials are designed to pull sweat away from the skin, keeping feet much drier and happier.
Here are the top contenders:
- Merino Wool: Don't let the word "wool" fool you—this isn't your grandma's itchy sweater! Merino wool is incredibly soft, breathable, and a champion at managing moisture.
- Synthetic Blends: Look for materials like polyester or nylon. These fabrics are engineered to be durable and excellent at wicking sweat away, making them perfect for active kids.
Choosing the right socks is just as crucial as choosing the right shoes to minimize friction. You can discover more about what makes the coolest running socks to help in this battle, as many of the same principles apply to active kids.
The Power of Shoe Materials
Just like socks, the material of the shoe itself makes a big difference. Shoes that can't "breathe" will trap heat and moisture, creating a perfect storm for blisters.
Pro Tip for the truly blister-prone: Try the double-sock method! Have your child wear a thin, synthetic liner sock underneath their regular cushioned sock. The idea is that any friction happens between the two layers of socks, not between the sock and their skin. It's a game-changer!
Look for shoes made from breathable materials that allow air to circulate freely. Genuine leather and canvas are fantastic options because they are porous and allow moisture to escape. Many modern athletic shoes also feature mesh panels that provide excellent ventilation, keeping those little feet cool and dry even during the most energetic play sessions. When considering your next pair, learning about the benefits of flexible shoes for toddlers can also point you toward materials designed for both comfort and healthy foot development.
A Gentle Break-In Plan for New Shoes
Think of new shoes and your child's feet as a new friendship—they need a little time to get comfy with each other! Sending your kiddo out for a full day of running and jumping in brand-new kicks is a recipe for tears.
Instead, let’s map out a gentle "get to know you" plan. A slow and steady break-in period gives the shoe’s material a chance to soften up and start molding to the unique shape of your child's foot.
The Indoor Adventure Phase
The best place to start is right inside your own home. This creates a low-pressure environment where your child can get used to the feel of the shoes without the demands of a playground adventure.
Let's think of this as a series of mini-missions:
- First Mission (30 mins): Have them wear their new shoes while they’re playing with toys or reading a book. Just 30 minutes of light activity is the goal.
- Second Mission (1 hour): The next day, level up to an hour. This could be during screen time or while they’re building an epic fort.
- Third Mission (2 hours): Once they’ve comfortably passed the one-hour mark, try a two-hour stretch during indoor playtime.
After each wear, check their feet immediately. Look for any pink or red spots, paying close attention to the back of the heel and the pinky toe. Catching a "hot spot" early means you can stop a blister before it even thinks about forming.
Making the Break-In a Game
Who says this has to be a chore? Turn it into a game!
You could throw a 30-minute "New Shoe Dance Party" in the living room—just crank up their favorite tunes and let them show off their moves. Or, create a silly "New Shoe Strut" where they have to walk in funny ways, which is a great way to help flex the shoe material in different directions.
For the littlest ones, even a short indoor walk is a big deal. For more tips on this stage, our post on toddler soft sole shoes has some great insights for encouraging those first steps.
This simple, gradual process ensures that by the time the shoes make their grand debut outdoors, they're already on their way to becoming a comfortable, trusted friend for your child's feet.
This quick visual guide shows how different sock materials—cotton, synthetics, and wool—handle moisture. It really highlights why switching from moisture-absorbing cotton to moisture-wicking synthetics or wool is such a smart move for active little feet.
How to Spot and Soothe Hot Spots
Even with the best planning, some shoes just have a mind of their own. You’re enjoying a day at the park, and then you hear it: "Mom, my shoe is rubbing!"
Don't panic! This is your chance to swoop in and stop a blister before it even thinks about forming.
Think of yourself as a blister detective on the hunt for "hot spots." These are those little red areas that act as an early warning system. Your mission is to find them fast and soothe them even faster. After any wear-in session, make it a quick, fun routine to do a foot check. A simple, "Let me see those super feet!" is all it takes to get a quick peek.
The Blister Detective's Checklist
So, what are you looking for? You’re on the lookout for any patch of skin that seems a little pinker or redder than the rest.
The most common trouble zones are almost always:
- The Back of the Heel: This is culprit number one, especially with stiffer shoes.
- The Pinky Toe: That poor little toe often gets squished and rubbed the wrong way.
- The Big Toe Joint: The side of the big toe can get a lot of friction, particularly in shoes that are a bit too narrow.
If your child mentions any rubbing or discomfort, take them seriously and check the spot immediately. A minute of prevention truly is worth a day of ouchies.
When you find a hot spot, the goal is to eliminate friction right away. Don’t wait for it to get worse! A small problem is always easier to solve than a big, bubbly one.
Your Immediate Action Plan
Once you've identified a trouble spot, it’s time for a little on-the-go magic. These simple tricks can bring instant relief and stop that friction in its tracks, helping you prevent blisters from new shoes for good.
Here’s a quick-glance guide for what to do the second you spot a little red spot that threatens to ruin the day.
Hot Spot Alert: What to Do Right Now
| Hot Spot Location | What It Looks Like | Immediate Action |
|---|---|---|
| Heel | A pink or reddish patch right where the shoe collar sits. | Apply a blister bandage or a piece of moleskin directly to the skin for a protective cushion. |
| Toes | Redness on the top or side of any toe, especially the pinky. | A dab of petroleum jelly or an anti-friction balm will create a slick surface so the shoe glides over it. |
| Top of Foot | A red line where the shoe's tongue or straps press down. | Loosen the laces slightly. If it's a sandal, apply a clear gel dot to the underside of the strap. |
Acting fast on these little warnings turns a potential day-ruiner into a minor pit stop. With these tricks up your sleeve, you'll be a pro at keeping those little feet happy and blister-free.
Keeping Little Feet Happy For The Long Haul
You did it! You’ve officially mastered the art of introducing new shoes without a single tear. Think of this as your victory lap and your go-to checklist for every new pair that enters your home.
Making these simple steps a habit is your secret weapon. You're not just avoiding a few ouchies; you're setting your child up for a lifetime of happy, comfortable adventures.
Your Blister-Free Cheat Sheet
Let's quickly recap the game plan. These are the golden rules for keeping those little feet smiling:
- Nail the Fit: Always, always, always start with the right size. Shoes that are too big or too small are a recipe for painful rubbing.
- Pick Perfect Socks: Ditch the cotton for moisture-wicking wonders. They keep feet dry and friction-free, which is half the battle.
- Break Them In Gently: Remember those indoor dance parties! A slow introduction is the kindest way to make new shoes feel like old friends.
- Act on Hot Spots: The moment you see a red spot, jump into action with your toolkit. A little moleskin now prevents a big tear later.
One of the biggest game-changers is simply keeping up with those growth spurts. Kids' feet grow at lightning speed, so checking their shoe size every few months is an absolute must. A shoe that fit perfectly last season could be this season's blister culprit.
The Never-Ending Adventure of Growing Feet
It feels like you blink and they've gone up a whole size! Because of this, regular fit checks are completely non-negotiable.
For a reliable way to measure at home, you can always refer to a handy online sizing guide to ensure you're getting the most accurate measurement.
And for families with multiple little ones, making sure the right shoes stay with the right kid can prevent mix-ups that lead to discomfort. A simple lifesaver for school or daycare is using some essential stick-on shoe labels for children.
By turning these tips into your family's routine, you'll become a blister-preventing pro, ready for any new shoe adventure that comes your way. Happy exploring!
Frequently Asked Questions
Still have a few lingering questions? Of course you do! When it comes to our kids' comfort, getting it right is all that matters. Here are a few quick answers to some of the most common things parents ask.
How Long Does It Take To Break In New Shoes?
Honestly, every pair of shoes is different. A soft pair of canvas sneakers might feel totally broken in after just a few hours of playing inside. On the other hand, stiffer shoes like leather boots can sometimes take a week or two of short, consistent wear before they really soften up.
The most important rule is to listen to your child. If they tell you something is rubbing or pinching, it’s time to take the shoes off for the day.
What if a Blister Forms Anyway?
It happens! Even with the best planning, a sneaky blister can pop up. First thing’s first: give that foot a rest from the shoe that caused the problem. Gently clean the area with a little soap and water.
The number one rule is to resist the urge to pop it! That little bubble is nature’s perfect sterile bandage, protecting the delicate skin underneath while it heals. Cover it with a special blister bandage—the cushioned, hydrocolloid kind are fantastic—to prevent more friction.
If you start to see signs of an infection, like pus or increasing redness, it's always best to check in with your doctor.
Can I Stretch My Kids' Shoes?
You can definitely give them a little nudge in the right direction! An easy, gentle way to do this is to have your child wear a pair of their thickest, fluffiest socks with the new shoes for about 30 minutes while they're at home. This can help the material give just enough to create a little more space.
For a specific tight spot, you can also use a hair dryer on a low heat setting. Point it at the tight area for about 20-30 seconds (from a safe distance, of course!), then have your child put the shoes on and walk around until they cool. This helps the material mold perfectly to their foot.
Ready to find the perfect pair that puts healthy foot development first? At pediped, we design shoes that are as comfortable as they are cute, so every adventure starts with a happy step. Explore our pediatrician-approved collections at https://www.pediped.com and say goodbye to blister battles
Leave a comment